Top 13 Tips on How to Produce a Video Interview

After producing hundreds of videos for the Montana Stockgrowers Association over the last few years, I wanted to share my videography tips with you, on a beginner’s level. I encourage anyone who is interested in creating videos, no matter if the goal is to promote beef or highlight a rancher’s life or educate on cattle care…get out your cameras and start shooting! There are endless possibilities for stories and the more voices we have, the more impact we will have in telling the beef story.
These tips are sort of the “nuts and bolts” of creating a standard video feature, with an interview. I compile this list after having gone through several years of video journalism training (shout out to the University of Iowa School of Journalism!)…so don’t feel like you have to be an expert right away. Play around with shots that work for your surroundings, your message and artistic style.
Please add your tips to the comment section of this post.
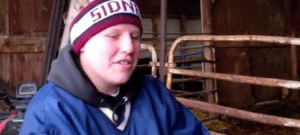
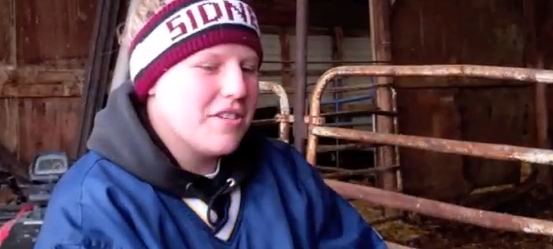
- Framing an interviewee: Avoid having subject in middle of frame, in a corner of the frame, or taking up too much of the frame. The rule of thirds should be applied:
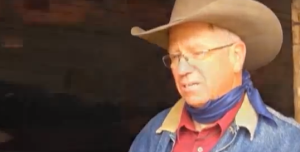

- Eye positioning: Subjects shouldn’t look directly at the camera, unless you are doing it for artistic style. Position their eyes so they are given what is called “Nose or Looking Room”. Also, try your best to shoot the subject at their eye level. This may mean you have to make yourself and the tripod at their eye level, since people are different heights.
- Head and shoulders: If people know their whole body is being filmed, they need to do very awkward and distracting things with their hands. Instead, frame your subject so that just the head and shoulders appear.
- Leading lines: Try to find naturally occurring lines to place behind your subject that would lead the viewers eyes towards the person. (The gate in this photo acts as a leading line.)
- Use a tripod: Most times it’s a pain to set-up a tripod when you want to catch action, but the shot will look so much better when it’s stabilized. I say this, but often break my own rule while trying to film on the rugged Montana ranches. Do what you can!
- Avoid placing subject in front of a window: This will cause them to become a shadow. Instead have your back to the window and their face towards it, allowing them to be lit by the natural light.
- Touching: When deciding what B-Roll (video that is not your interview) to shoot, think about what you or your subject will say in your final edited piece. If your subject is talking about an iguana at the zoo, definitely have multiple shots of the iguana. Then you can use this video to “cover” audio.
- B-Roll of the person: If your piece is a profile of, for example, a cattle rancher, to supplement the interview, take time to record B-Roll of the rancher performing his tasks; keeping in mind the shot sequence bullet above.
- Sequence shooting: Wide, medium, tight shots of your subject. For example: Wide shot of a classroom, then medium shot of a student at desk, then tight shot of their hands writing with a pen, then a tight shot of their eyes looking at the paper, maybe another medium shot of over their shoulder. The more variety of action shots you take in the field, the easier your editing and story-building will be.
- Avoid zooming in and out as much as possible. Physically move closer to your subject…otherwise your movement could make the viewer unable to focus.
- Pans (horizontal) and tilts (vertical) are fine, but try not too over-use them in your video piece.
- Audio: If there is a problem with the audio, your story won’t keep viewers’ attention. Before starting your interview, do a microphone check by recording natural sound and talking into the mic. Then play it back so you are certain you are recording.
- Nats: Natural sound (nats) is essentially like another interview. You want to capture whatever sound will help to tell your story. For example, if your subject is a dog obedience trainer, then make sure to get audio of dogs barking or panting. However, when editing, don’t let these sounds overpower your subject’s voice. Additionally, nats can make an entire video themselves if you create an audio slide show with just still images. This is just another creative and artistic venue you can take to tell the story.
For more videography tips or technical questions, please feel free to consult with Lauren ([email protected]). Look for more posts surrounding this subject such as how to edit video and equipment to try for your recordings.
This blog post is part of the Montana Family Ranching Project and the #SocialBeef movement.
Share this:

About Author
The Montana Stockgrowers Association, a non-profit membership organization, has worked on behalf of Montana’s cattle ranching families since 1884. Our mission is to protect and enhance Montana ranch families’ ability to grow and deliver safe, healthy, environmentally wholesome beef to the world.